Showing posts with label Html Editor. Show all posts

Monday, February 10, 2014

How to Add Adsense Ads In the Middle or Anywhere inside Blogger Posts

 
In a previous post we saw how and where we can place Adsense ads on our blog; however, these methods would only work when we place the ads on predetermined and fixed locations. For posts area, the most common places are below the title, at the beginning of the post or at the end of the post.

But what if we want to display an AdSense ad in the middle of a post?

We can manipulate the location of the ads to be displayed by adding a script inside the template, then using a label inside our post to where we want the AdSense ad to appear. Once added, we can place the ads anywhere, be it between paragraphs or in the middle of the content etc.
Manually inserting Adsense ads in the middle of posts in Blogger is pretty simple, just follow these steps below:

Before proceeding, it is recommended do backup your template (go to Template > click on the Backup/restore button)

Step 1. First thing we need to do is to "parse" the AdSense code, in other words, convert it to plain text. Then go to Template, click on the Edit HTML button, click anywhere inside the code area and look for this tag (CTRL + F):
<data:post.body/>
Note: you may find it several times, but we need to stop at the second one or if you can't see any changes, test the third one

Screenshot
Step 2. Replace the <data:post.body/> tag with this code:
<div expr:id='"adsmiddle1" + data:post.id'></div>
<div style="clear:both; margin:10px 0">
<!-- Add here the code of your ad -->
</div>
<div expr:id='"adsmiddle2" + data:post.id'>
<data:post.body/>
</div>
<script type="text/javascript">
var obj0=document.getElementById("adsmiddle1<data:post.id/>");
var obj1=document.getElementById("adsmiddle2<data:post.id/>");
var s=obj1.innerHTML;
var r=s.search(/\x3C!-- adsense --\x3E/igm);
if(r>0) {obj0.innerHTML=s.substr(0,r);obj1.innerHTML=s.substr(r+16);}
</script>
Step 3. Put the converted Adsense code to where you see the <!-- Add here the code of your ad --> annotation, then save the changes by clicking on the Save template button

Step 4. When you create a New Post, add this tag inside the HTML section in the exact location where you want the Google AdSense ads to appear:
<!-- adsense -->
For example:
<div>This is a demo text. This is a demo text. This is a demo text. This is a demo text. This is a demo text. This is a demo text. This is a demo text. This is a demo text. This is a demo text. This is a demo text.</div>
<!-- adsense --><div>This is a demo text. This is a demo text. This is a demo text. This is a demo text. This is a demo text. This is a demo text. This is a demo text. This is a demo text. This is a demo text. This is a demo text.</div>

Screenshot
Note: If you don't add the label to bring up the ad then the ad appears below the title by default.

This method doesn't violate Google's Terms of Service because you are not changing the structure of the ad.

How to Add an Admin Control Panel in Blogger

A while ago I've posted some tutorials on how you can remove the Blogger Navbar or add a Peek A Boo Effect so that it would show only when we mouse over on top of our page.

However, customizing or removing the Blogger Navbar also has its downside because the admin links for "New post", "Customize" and "Log Out" will be no longer visible and navigating through the blog functions could be really frustrating sometimes. When the navbar is visible, blog administrators can easily create a new post or customize their template with just one click; however, when the navbar is hidden, many more clicks are required to access the Blogger dashboard panel again.

So in this tutorial, we'll see how to add an "Admin Control Panel" menu with many cool additions such as:

- access to the Blogger's Homepage
- create a New Page or Post
- view all your posts
- read your comments
- access the Blog's layout to add or rearrange gadgets
- edit the HTML of your Template
- refresh current page or post
- open a new tab with your blog's homepage
- access the blog' settings
- view your stats
- ...and finally, log out

We will put all these options on the top of your page as a menu and we will make it visible only to the administrator of the blog, so our blog visitors will not be able to see it.

The result will be something like this:

admin control panel for blogger

Getting the Blog ID 

The first thing we need to do is get the ID of our blog by clicking on any option from our Blog Dashboard, for example Settings. Once we have clicked there, take a look at the address bar in your browser:

blogger id number

Within the URL you will notice a string like this:
blogID=XXXXXXXXX
Where XXXXXXXXX is the unique identifier (ID) for your blog.

Copy the ID for the blog you wish to work with so we can add this in the links for your admin control panel.

Adding the admin control panel to Blogger template


The Admin Control Panel will only be visible when the blog author is logged in. It is invisible to blog readers, similar to the Edit post/widget pencil icons which are only visible to you while you are logged in.

To add the control panel to your Blogger template, follow the steps below:

Step 1. Go to Template and click on the Edit HTML button:


Step 2. Click anywhere inside the code area and press the CTRL + F keys to open the Blogger' search box

Step 3. Paste this line inside the search box then hit Enter to find it:
<body expr:class='&quot;loading&quot; + data:blog.mobileClass'>
Note: if you can't find this line, try to find the <body> tag.

Step 4. Just below this line, add the following code:
<span class='item-control blog-admin'>
<style>
.control-panel ul{z-index: 20; position: absolute; margin: 0px auto; background-color: #F6F6F6; width: 100%; }
.control-panel ul li{display: inline-block; float: left; padding: 7px 0px;}
.control-panel ul li a {color:#686868;padding: 7px 15px;border-right: 1px solid #E3E3E3;font-weight: bold;font-size: 13px;}
.control-panel a:hover {text-decoration:none; color:#FC8F44;}
</style>
<div class='control-panel'>
<ul>
<li><a href='http://www.blogger.com/home'>My Blogs</a></li>
<li><a href='http://www.blogger.com/blogger.g?blogID=XXXXXXXXXXXXX#editor/src=sidebar'>New Post</a></li>
<li><a href='http://www.blogger.com/blogger.g?blogID=XXXXXXXXXXXXX#editor/target=page'>New Page</a></li>
<li><a href='http://www.blogger.com/blogger.g?blogID=XXXXXXXXXXXXX#posts'>All Posts</a></li>
<li><a href='http://www.blogger.com/blogger.g?blogID=XXXXXXXXXXXXX#comments'>Comments</a></li>
<li><a href='http://www.blogger.com/blogger.g?blogID=XXXXXXXXXXXXX#pageelements'>Layout</a></li>
<li><a href='http://www.blogger.com/blogger.g?blogID=XXXXXXXXXXXXX#templatehtml'>Edit HTML</a></li>
<li><a href='#' onclick='location.reload(true); return false;'>Refresh</a></li>
<li><a href='/' target='_blank'>New Tab</a></li>
<li><a href='http://www.blogger.com/blogger.g?blogID=XXXXXXXXXXXXX#basicsettings'>Settings</a></li>
<li><a href='http://www.blogger.com/blogger.g?blogID=XXXXXXXXXXXXX#overviewstats'>Stats</a></li>
<li><a href='http://www.blogger.com/logout.g'>Logout</a></li>
</ul>
</div>
</span>
Change XXXXXXXXXXXXX with your unique Blog ID previously copied, and be careful not to delete anything, like quote or any other character.

Step 4. Click on the Save template button to save the changes.

Now take a look at your blog. While you are logged in to Blogger, you should notice your control panel appear on top of your blog. Enjoy!

With this admin control panel for Blogger you can easily access the functions of the blog and you will not have to always open your blog page and the Blogger homepage at the same time.

How to Add Adsense Ads In the Middle or Anywhere inside Blogger Posts

In a previous post we saw how and where we can place Adsense ads on our blog; however, these methods would only work when we place the ads on predetermined and fixed locations. For posts area, the most common places are below the title, at the beginning of the post or at the end of the post.

But what if we want to display an AdSense ad in the middle of a post?

We can manipulate the location of the ads to be displayed by adding a script inside the template, then using a label inside our post to where we want the AdSense ad to appear. Once added, we can place the ads anywhere, be it between paragraphs or in the middle of the content etc.
Manually inserting Adsense ads in the middle of posts in Blogger is pretty simple, just follow these steps below:

Before proceeding, it is recommended do backup your template (go to Template > click on the Backup/restore button)

Step 1. First thing we need to do is to "parse" the AdSense code, in other words, convert it to plain text. Then go to Template, click on the Edit HTML button, click anywhere inside the code area and look for this tag (CTRL + F):
<data:post.body/>
Note: you may find it several times, but we need to stop at the second one or if you can't see any changes, test the third one

Screenshot
Step 2. Replace the <data:post.body/> tag with this code:
<div expr:id='"adsmiddle1" + data:post.id'></div>
<div style="clear:both; margin:10px 0">
<!-- Add here the code of your ad -->
</div>
<div expr:id='"adsmiddle2" + data:post.id'>
<data:post.body/>
</div>
<script type="text/javascript">
var obj0=document.getElementById("adsmiddle1<data:post.id/>");
var obj1=document.getElementById("adsmiddle2<data:post.id/>");
var s=obj1.innerHTML;
var r=s.search(/\x3C!-- adsense --\x3E/igm);
if(r>0) {obj0.innerHTML=s.substr(0,r);obj1.innerHTML=s.substr(r+16);}
</script>
Step 3. Put the converted Adsense code to where you see the <!-- Add here the code of your ad --> annotation, then save the changes by clicking on the Save template button

Step 4. When you create a New Post, add this tag inside the HTML section in the exact location where you want the Google AdSense ads to appear:
<!-- adsense -->
For example:
<div>This is a demo text. This is a demo text. This is a demo text. This is a demo text. This is a demo text. This is a demo text. This is a demo text. This is a demo text. This is a demo text. This is a demo text.</div>
<!-- adsense --><div>This is a demo text. This is a demo text. This is a demo text. This is a demo text. This is a demo text. This is a demo text. This is a demo text. This is a demo text. This is a demo text. This is a demo text.</div>

Screenshot
Note: If you don't add the label to bring up the ad then the ad appears below the title by default.

This method doesn't violate Google's Terms of Service because you are not changing the structure of the ad.

Spacegallery: image gallery/slideshow made with jQuery

 
There are many types of galleries for images that can be found on the internet, but we rarely find one showing images so differently like this one. Those using Mac OS X will surely notice a lot of similarity with TimeMachine and those who don't, for sure will enjoy this type of effect for viewing images.
I'm talking here about Spacegallery, an image gallery done with jQuery in which images are being displayed one after another when clicking on them. Click on the pictures below to see how it works:


How to Add Spacegallery Image Slideshow to Blogger

To implement this gallery is very simple. Just follow the steps below:

Step 1. Log in to your Blogger Dashboard and select your blog > go to Template and click the Edit HTML button.

Step 2. Click anywhere on the code area and search by using the CTRL + F keys for this tag
</head>
Step 3. Before the </head> tag, paste the following scripts:
<script src='http://ajax.googleapis.com/ajax/libs/jquery/1.10.2/jquery.min.js' type='text/javascript'/>
<script src='http://helplogger.googlecode.com/svn/trunk/SpaceGallery/eye.js' type='text/javascript'/>
<script src='http://helplogger.googlecode.com/svn/trunk/SpaceGallery/utils.js' type='text/javascript'/>
<script src='http://helplogger.googlecode.com/svn/trunk/SpaceGallery/spacegallery.js' type='text/javascript'/>

<script type='text/javascript'>
//<![CDATA[
(function($){
var initLayout = function() {
var hash = window.location.hash.replace('#', '');
var currentTab = $('ul.navigationTabs a')
.bind('click', showTab)
.filter('a[rel=' + hash + ']');
if (currentTab.size() == 0) {
currentTab = $('ul.navigationTabs a:first');
}
showTab.apply(currentTab.get(0));
$('#myGallery').spacegallery({loadingClass: 'loading'});
};

var showTab = function(e) {
var tabIndex = $('ul.navigationTabs a')
.removeClass('active')
.index(this);
$(this)
.addClass('active')
.blur();
$('div.tab')
.hide()
.eq(tabIndex)
.show();
};

EYE.register(initLayout, 'init');
})(jQuery)
//]]>
</script>
Screenshot
Note: if you have already jQuery added in the template, then delete the line in red.

Step 4. Next, search for ]]></b:skin> (CTRL + F) and when you found it, click on the arrow next to it:


Step 5. Paste just above ]]></b:skin> the following CSS style:
#myGallery {
width: 100%;
height: 400px;
}
#myGallery img {
border: 2px solid #52697E;
}
a.loading {
background: url(https://blogger.googleusercontent.com/img/b/R29vZ2xl/AVvXsEjQqaP1gAFWpz04lX0bnL2bTEen91-Ilfz0dL71Kp5XCSNjklcBBPdDXfedGo25Ssp2KjA0HqLWEqbZbSp05fHQx62TEBHuFFS6mrp8YTwrKLmZHXa4om37Xr_YtFlhTiwD_GHt387R0Fft/s1600/ajax_small.gif) no-repeat center;
}
.spacegallery {
position: relative;
overflow: hidden;
}
.spacegallery img {
position: absolute;
left: 50%;
}
.spacegallery a {
position: absolute;
z-index: 1000;
display: block;
top: 0;
left: 0;
width: 100%;
height: 100%;
}
Step 6. To save the changes, click the Save template button.

Step 7. Finally, go to Layout > Add a Gadget > HTML/Javascript and copy-paste the code below:
<div class="spacegallery" id="myGallery">
<img src="Image URL"/>
</div>
Replace the Image URL text with the image addresses that you want to appear on the gallery, considering that the last image is the first to be displayed. And if you want to add this slideshow inside a post, just go to your dashboard and create a New Post, then paste the code in the HTML section.
That's it! Now, you can enjoy this simple image gallery on your blog and although, it has no display options or settings, is without a doubt a gallery that will draw the attention of your readers.

Add a forum on your Blogger blog with Nabble

Forum is a platform where visitors can interact with each other and discuss different hot topics. There you can add desired topics for getting comments and diverse suggestions on them. If you have a good traffic, then you can place questions on daily basis for the potential visitors to answer, thus your forum simultaneously converts itself into a huge frequently asked quesions section "FAQ". Forums will provide your visitors an open social atmosphere to express their useful ideas and share other's ideas.

In this brief tutorial, I have explained simple steps to add a forum to your Blogger or blogspot blog. So let's get started!

How to Create a Forum With Nabble


To implement a forum we will use Nabble, in my opinion, one of the best free options. We go to Nabble page and there, we will create an account (keep in mind that this account will be the moderator of the forum).
And once we have everything set (it also has a wide variety of customizing options), go to Options -> Application -> Change appearance:

nabble change appearance

There, we can also edit the CSS of the forum and other things...

Now we have to give the structure of a real forum, i.e. organizing it by categories. To do this click on the Options menu, select Application, then click Change application type:

nabble option change application type

Then choose the Forum category and save your changes.

To finish, we only have to create categories and for this go back to Options, this time select Structure and then choose Create a new sub-forum:
nabble create new sub-forum

Fill in the details of the category and that's it, you will have your forum running.

The rest are small details, like sort categories (Options > Structure > Manage sub-forums), customize your avatar and your signature (YourNickname > Account Settings), change permissions (Options > Users > Permissions), etc.

Now for integrating the newly created forum to your blog, you must go to Options - Embedding options and copy the javascript code.
nabble forum embedding options

Embed the forum in a Blogger page


Login to your Blogger Dashboard, select your blog, click the Pages link on the left sidebar and create a new Blank Page


Once there, get in the HTML mode.


Paste inside the empty box the code that we copied earlier, and if everything went well, we should see our brand new forum for our blog!

create a forum for blogger with nabble

I hope this tutorial was helpful to you and you will begin using this great service.

Add Keyboard Keys Effect To Your Text in Blogger with CSS

For many of us the design and the template are the most important, making our readers be more interested and coming back to our blog. There's an HTML element meant for marking up keyboard keys named <kbd> which can be styled with CSS, so why not use it to make those elements look the keyboard keys?

Thus, in this tutorial, I am going to show you how to create a keyboard keys effect with CSS. It doesn't require images so your blog will load faster.

How to Add Keyboard Keys to Blogger


Step 1. From Blogger Dashboard, select your blog and go to Template > Edit HTML

edit the html of blogger template

Step 2. Click anywhere inside the code area, press the Ctrl + F keys and search for this piece of code:
]]></b:skin>
Screenshot
Click on the arrow to expand the code

Step 3: Just above ]]></b:skin> paste this CSS style:
kbd{
border:1px solid gray;
font-size:1.2em;
box-shadow:1px 0 1px 0 #eee, 0 2px 0 2px #ccc, 0 2px 0 3px #444;
-webkit-border-radius:3px;
-moz-border-radius:3px;
border-radius:3px;
margin:2px 3px;
padding:1px 5px;
}
Step 4. To save the changes, press the Save change button.

Finally, we need to add the html <kbd> tags to the text on which we want to apply the keyboard keys style.
From your blogger's dashboard, go to create a New Post, write the text on which you want to apply the style and go to the HTML tab. Before and after the text, add the following HTML tags:
<kbd>Ctrl</kbd> + <kbd>F</kbd>
Screenshot
text with keyboard key effect

This will make it to look like this:

Ctrl + F

How to embed a youtube playlist on your blogger blog

In this tutorial you will see how to create a YouTube video gallery using jQuery and add the Youtube playlist to your Blogger blog. Inside this gallery/playlist, you can add your favorite youtube videos or any video that you want to share with your visitors. Because of its default dimensions (width of 765px), it is recommended to add it just below the blog header, however, you can edit CSS code to fit anywhere you want to add it.

youtube playlist for blogger

To add this video slider/youtube playlist to your blog, please follow these steps below:


Step 1. From your blogger dashboard, go to Template > Edit HTML and click anywhere inside the code area to open the Blogger search box by pressing the CTRL + F keys.


Step 2. Type or paste the </head> tag inside the search box and hit Enter to find it.
Just above this tag, add the following scripts:

<script src='http://ajax.googleapis.com/ajax/libs/jquery/1.8.2/jquery.min.js' type='text/javascript'/>
<script>
//<![CDATA[
/*hoverscroll v.0.2.4*/
(function($) {
$.fn.hoverscroll = function(params) {
if (!params) { params = {}; }
params = $.extend({}, $.fn.hoverscroll.params, params);
this.each(function() {
var $this = $(this);
if (params.debug) {$.log('[HoverScroll] Trying to create hoverscroll on element ' + this.tagName + '#' + this.id);}
if (params.fixedArrows) {
$this.wrap('<div class="fixed-listcontainer"></div>')
}
else {
$this.wrap('<div class="listcontainer"></div>');
}

$this.addClass('list');
var listctnr = $this.parent();
listctnr.wrap('<div class="ui-widget-content hoverscroll' +
(params.rtl && !params.vertical ? " rtl" : "") + '"></div>');
//listctnr.wrap('<div class="hoverscroll"></div>');

var ctnr = listctnr.parent();

var leftArrow, rightArrow, topArrow, bottomArrow;
if (params.arrows) {
if (!params.vertical) {
if (params.fixedArrows) {
leftArrow = '<div class="fixed-arrow left"></div>';
rightArrow = '<div class="fixed-arrow right"></div>';

listctnr.before(leftArrow).after(rightArrow);
}
else {
leftArrow = '<div class="arrow left"></div>';
rightArrow = '<div class="arrow right"></div>';

listctnr.append(leftArrow).append(rightArrow);
}
}
else {
if (params.fixedArrows) {
topArrow = '<div class="fixed-arrow top"></div>';
bottomArrow = '<div class="fixed-arrow bottom"></div>';

listctnr.before(topArrow).after(bottomArrow);
}
else {
topArrow = '<div class="arrow top"></div>';
bottomArrow = '<div class="arrow bottom"></div>';

listctnr.append(topArrow).append(bottomArrow);
}
}
}
ctnr.width(params.width).height(params.height);

if (params.arrows && params.fixedArrows) {
if (params.vertical) {
topArrow = listctnr.prev();
bottomArrow = listctnr.next();

listctnr.width(params.width)
.height(params.height - (topArrow.height() + bottomArrow.height()));
}
else {
leftArrow = listctnr.prev();
rightArrow = listctnr.next();

listctnr.height(params.height)
.width(params.width - (leftArrow.width() + rightArrow.width()));
}
}
else {
listctnr.width(params.width).height(params.height);
}

var size = 0;

if (!params.vertical) {
ctnr.addClass('horizontal');
$this.children().each(function() {
$(this).addClass('item');

if ($(this).outerWidth) {
size += $(this).outerWidth(true);
}
else {
size += $(this).width() + parseInt($(this).css('padding-left')) + parseInt($(this).css('padding-right'))
+ parseInt($(this).css('margin-left')) + parseInt($(this).css('margin-right'));
}
});
$this.width(size);

if (params.debug) {
$.log('[HoverScroll] Computed content width : ' + size + 'px');
}
if (ctnr.outerWidth) {
size = ctnr.outerWidth();
}
else {
size = ctnr.width() + parseInt(ctnr.css('padding-left')) + parseInt(ctnr.css('padding-right'))
+ parseInt(ctnr.css('margin-left')) + parseInt(ctnr.css('margin-right'));
}

if (params.debug) {
$.log('[HoverScroll] Computed container width : ' + size + 'px');
}
}
else {
ctnr.addClass('vertical');
$this.children().each(function() {
$(this).addClass('item')

if ($(this).outerHeight) {
size += $(this).outerHeight(true);
}
else {
size += $(this).height() + parseInt($(this).css('padding-top')) + parseInt($(this).css('padding-bottom'))
+ parseInt($(this).css('margin-bottom')) + parseInt($(this).css('margin-bottom'));
}
});
$this.height(size);

if (params.debug) {
$.log('[HoverScroll] Computed content height : ' + size + 'px');
}
if (ctnr.outerHeight) {
size = ctnr.outerHeight();
}
else {
size = ctnr.height() + parseInt(ctnr.css('padding-top')) + parseInt(ctnr.css('padding-bottom'))
+ parseInt(ctnr.css('margin-top')) + parseInt(ctnr.css('margin-bottom'));
}

if (params.debug) {
$.log('[HoverScroll] Computed container height : ' + size + 'px');
}
}
var zone = {
1: {action: 'move', from: 0, to: 0.06 * size, direction: -1 , speed: 16},
2: {action: 'move', from: 0.06 * size, to: 0.15 * size, direction: -1 , speed: 8},
3: {action: 'move', from: 0.15 * size, to: 0.25 * size, direction: -1 , speed: 4},
4: {action: 'move', from: 0.25 * size, to: 0.4 * size, direction: -1 , speed: 2},
5: {action: 'stop', from: 0.4 * size, to: 0.6 * size},
6: {action: 'move', from: 0.6 * size, to: 0.75 * size, direction: 1 , speed: 2},
7: {action: 'move', from: 0.75 * size, to: 0.85 * size, direction: 1 , speed: 4},
8: {action: 'move', from: 0.85 * size, to: 0.94 * size, direction: 1 , speed: 8},
9: {action: 'move', from: 0.94 * size, to: size, direction: 1 , speed: 16}
}

ctnr[0].isChanging = false;
ctnr[0].direction = 0;
ctnr[0].speed = 1;
function checkMouse(x, y) {
x = x - ctnr.offset().left;
y = y - ctnr.offset().top;

var pos;
if (!params.vertical) {pos = x;}
else {pos = y;}

for (i in zone) {
if (pos >= zone[i].from && pos < zone[i].to) {
if (zone[i].action == 'move') {startMoving(zone[i].direction, zone[i].speed);}
else {stopMoving();}
}
}
}

function setArrowOpacity() {
if (!params.arrows || params.fixedArrows) {return;}

var maxScroll;
var scroll;

if (!params.vertical) {
maxScroll = listctnr[0].scrollWidth - listctnr.width();
scroll = listctnr[0].scrollLeft;
}
else {
maxScroll = listctnr[0].scrollHeight - listctnr.height();
scroll = listctnr[0].scrollTop;
}
var limit = params.arrowsOpacity;
var opacity = (scroll / maxScroll) * limit;

if (opacity > limit) { opacity = limit; }
if (isNaN(opacity)) { opacity = 0; }

var done = false;
if (opacity <= 0) {
$('div.arrow.left, div.arrow.top', ctnr).hide();
if(maxScroll > 0) {
$('div.arrow.right, div.arrow.bottom', ctnr).show().css('opacity', limit);
}
done = true;
}
if (opacity >= limit || maxScroll <= 0) {
$('div.arrow.right, div.arrow.bottom', ctnr).hide();
done = true;
}

if (!done) {
$('div.arrow.left, div.arrow.top', ctnr).show().css('opacity', opacity);
$('div.arrow.right, div.arrow.bottom', ctnr).show().css('opacity', (limit - opacity));
}
}

function startMoving(direction, speed) {
if (ctnr[0].direction != direction) {
if (params.debug) {
$.log('[HoverScroll] Starting to move. direction: ' + direction + ', speed: ' + speed);
}

stopMoving();
ctnr[0].direction = direction;
ctnr[0].isChanging = true;
move();
}
if (ctnr[0].speed != speed) {
if (params.debug) {
$.log('[HoverScroll] Changed speed: ' + speed);
}

ctnr[0].speed = speed;
}
}

function stopMoving() {
if (ctnr[0].isChanging) {
if (params.debug) {
$.log('[HoverScroll] Stoped moving');
}

ctnr[0].isChanging = false;
ctnr[0].direction = 0;
ctnr[0].speed = 1;
clearTimeout(ctnr[0].timer);
}
}

function move() {
if (ctnr[0].isChanging == false) {return;}

setArrowOpacity();

var scrollSide;
if (!params.vertical) {scrollSide = 'scrollLeft';}
else {scrollSide = 'scrollTop';}

listctnr[0][scrollSide] += ctnr[0].direction * ctnr[0].speed;
ctnr[0].timer = setTimeout(function() {move();}, 50);
}

if (params.rtl && !params.vertical) {
listctnr[0].scrollLeft = listctnr[0].scrollWidth - listctnr.width();
}

ctnr
.mousemove(function(e) {checkMouse(e.pageX, e.pageY);})
.bind('mouseleave', function() {stopMoving();});

this.startMoving = startMoving;
this.stopMoving = stopMoving;

if (params.arrows && !params.fixedArrows) {
// Initialise arrow opacity
setArrowOpacity();
}
else {
// Hide arrows
$('.arrowleft, .arrowright, .arrowtop, .arrowbottom', ctnr).hide();
}
});

return this;
};

if (!$.fn.offset) {
$.fn.offset = function() {
this.left = this.top = 0;

if (this[0] && this[0].offsetParent) {
var obj = this[0];
do {
this.left += obj.offsetLeft;
this.top += obj.offsetTop;
} while (obj = obj.offsetParent);
}

return this;
}
}

$.fn.hoverscroll.params = {
vertical: false,
width: 400,
height: 50,
arrows: true,
arrowsOpacity: 0.7,
fixedArrows: false,
rtl: false,
debug: false
};
$.log = function() {
try {console.log.apply(console, arguments);}
catch (e) {
try {opera.postError.apply(opera, arguments);}
catch (e) {}
}
};
})(jQuery);

$(function(){
$("#videoslider-tabs a").click(function(){
var container = $("#videoslider-content");
container.html("<img src='https://blogger.googleusercontent.com/img/b/R29vZ2xl/AVvXsEjJvfQKOg1nUhVM7-G0bNoVYekUw0hdW0z4Zac9e6cgyzCeQzxR_5fG-Ct0ZwI79hF_5aPiihLd_1IrWo9ZIAjQZKQ-kaRYI_dMIRn1jAYqJi7uonFBaiVaoWOqbdASNe7UrQHPXSc8rwNP/s1600/loading.png' class='loading-vid' />");
var id = $(this).attr("href").slice(1);
loadvideo(id);
return false;
});
$("#videoslider-tabs").hoverscroll({vertical:true,width:300,height:330,arrows:false});
$("#videoslider-tabs li").hover(function(){$(this).addClass("hover");},function(){$(this).removeClass("hover");});
loadvideo();
});

function loadvideo (hash){if(hash){hash = hash.slice(3);$("#videoslider-content").html(video[hash]);$("#videoslider-tabs li").removeClass("actVid");$("#videoslider-tabs a[href=#vid"+hash+"]").parent().addClass("actVid");}else{$("#videoslider-content").html(video[1]);$("#videoslider-tabs li").removeClass("actVid");$("#videoslider-tabs a[href=#vid1]").parent().addClass("actVid");}}
//]]>
</script>

Step 3. Now let's add the CSS code. Just above the same </head> tag, add this code:
<style>
#videoslider {
background:#F6F6F6; /* Background color */
clear:both;
margin:0 auto;
padding:5px;
width:735px;
border-radius: 5px;
border: 1px solid #C1C1C1;
-moz-background-clip: padding;
-webkit-background-clip: padding-box;
background-clip: padding-box;
}
#videoslider, #videoslider-content, #videoslider-tabs {
height:340px;
}
#videoslider-content {
color:#fff;
float:left;
text-align:center;
width:430px;
z-index:1;
}
.loading-vid {
display:block;
margin:165px auto 0;
}
#videoslider-tabs {
float:right;
width:240px;
margin:0;
}
#videoslider-tabs li {
background-color:#F6F6F6;
border: 1px solid #C1C1C1;
float:left;
height:60px;
padding:5px;
width:240px;
list-style:none;
overflow: hidden;
}
#videoslider-tabs li a {
padding:0 !important;
border:0 !important;
}
#videoslider-tabs li.hover {
background-color:#EBEBEB;
}
#videoslider-tabs li.actVid {
background:#555;
}
#videoslider-tabs li img.thumb-vid {
background-color:#EEEEEE;
float:left;
height:52px;
margin:0 8px 0 0;
padding:5px;
width:52px;
}
#videoslider-tabs li span.vidTit {
display:block;
color:#128EC9; /* Titles color */
font-size:12px; /* Titles font size */
font-weight:bold;
text-decoration:none;
}
#videoslider-tabs li .vidDesc {
display:block;
color:#222222; /* Color of the description */
font-size:11px; /* Font size of the description */
font-weight:bold;
text-decoration:none;
}
#videoslider-tabs a {
text-decoration:none;
}
#videoslider-tabs li.actVid .vidDesc {
color:#fff;
}
#videoslider-tabs li span.vidTit .actVid {
color:#fff; /* Titles color */
}
.ui-widget-content{
float:right;
overflow-y: scroll;
overflow-x: hidden;
}
.tabs-outer {
background-image: none !important;
}
#videoslider-tabs li a:hover {
background: none !important;
}</style>
Step 4. Click on the Save Template button

To make this youtube playlist work we need to add the HTML structure of it:

Step 5. Go to Layout or Pages or anywhere you want to add it and add the following code inside the HTML area (if you want to add it as a widget, paste the code inside a HTML/Javascript gadget by clicking on Add a gadget link within the Layout/Page Elements section):
<script>
var video = [];
video[1] = '<iframe width="460" height="345" src="http://www.youtube.com/embed/video_ID_1" frameborder="0" allowfullscreen></iframe>';
video[2] = '<iframe width="460" height="345" src="http://www.youtube.com/embed/video_ID_2" frameborder="0" allowfullscreen></iframe>';
video[3] = '<iframe width="460" height="345" src="http://www.youtube.com/embed/video_ID_3" frameborder="0" allowfullscreen></iframe>';
video[4] = '<iframe width="460" height="345" src="http://www.youtube.com/embed/video_ID_4" frameborder="0" allowfullscreen></iframe>';
video[5] = '<iframe width="460" height="345" src="http://www.youtube.com/embed/video_ID_5" frameborder="0" allowfullscreen></iframe>';
</script>
<div id="videoslider">
<div id="videoslider-content"></div>
<ul id="videoslider-tabs">
<li><a href="#vid1"><img src="//i2.ytimg.com/vi/video_ID_1/default.jpg" class="thumb-vid" /><span class="vidTit">Video Name</span><span class="vidDesc">Video Description</span></a></li>

<li><a href="#vid2"><img src="//i2.ytimg.com/vi/video_ID_2/default.jpg" class="thumb-vid" /><span class="vidTit">Video Name</span><span class="vidDesc">Video Description</span></a></li>

<li><a href="#vid3"><img src="//i2.ytimg.com/vi/video_ID_3/default.jpg" class="thumb-vid" /><span class="vidTit">Video Name</span><span class="vidDesc">Video Description</span></a></li>

<li><a href="#vid4"><img src="//i2.ytimg.com/vi/video_ID_4/default.jpg" class="thumb-vid" /><span class="vidTit">Video Name</span><span class="vidDesc">Video Description</span></a></li>

<li><a href="#vid5"><img src="//i2.ytimg.com/vi/video_ID_5/default.jpg" class="thumb-vid" /><span class="vidTit">Video Name</span><span class="vidDesc">Video Description</span></a></li>
</ul>
</div>

Add the IDs of your videos to where it says video_ID_..., titles (Video Name) and a brief description (Description).
To get the ID of a video, open the video on YouTube and look at the address bar - you need only the last characters after "v="


Note that each video ID should be added two times, the ones in red are for the video and the ones in orange are for the tabs thumbnail.

To add more videos, add two lines like the ones in bold above and then change the video[] and #vid... number. If you decided to add it inside a post or page, please make sure that you don't switch back to the Compose tab and publish your post while you're still on the HTML tab, otherwise the #vid location will be replaced with some other odd Blogger URLs.

Multi Hover Effect On Blogger Images Using Pure CSS

Today I'm going to show you how to add an amazing mouseover effect for Blogger images using only CSS, in which moving your mouse over an image from different directions (from above, from below, etc) will cause an overlay transitioned in from the same vector. This trick will change not only the images appearance when moving mouse over them, but will also allow you to add inside a text with a description.

hover effect, mouseover, blogger hover effects

You can see the effect on this image below: try moving your mouse from the left, right, and above.

hover right hover top hover left hover bottom

Adding Hover Effect From Different Directions on Blogger Images

First thing to do is to add the CSS style to our Template:

Step 1. From Blogger Dashboard, go to Template and press the Edit HTML button


Step 2. Search for the </head> tag - to find it, click anywhere inside the code area, press CTRL + F keys and type it in the search box.


Step 3. After you found it, add the following style just above it: 
<style>
  /* The container and the image */
  div.multi-hover {
    overflow: hidden;
    position: relative;
    vertical-align: middle;
    width: 100%;
    height: 358px;
    line-height: 358px;
  }
  div.multi-hover img {width: 100%;}

/* The texts that, by default, are hidden */
  div.multi-hover span {
    color: #FFF;
    font-size: 32px;
    font-weight: bold;
    height: 100%;
    opacity: 0;
    position: absolute;
    text-align: center;
    transition: all 0.3s linear 0s;
    width: 100%;
  }

/* And this is what will generate the effect */
  div.multi-hover span:nth-child(1) { /* right */
    background: none repeat scroll 0 0 rgba(255, 189, 36, 0.6);
    left: 90%;
    top: 0;
  }
  div.multi-hover span:nth-child(2) { /* top */
    background: none repeat scroll 0 0 rgba(106, 170, 255, 0.6);
    left: 0;
    top: -80%;
  }
  div.multi-hover span:nth-child(3) { /* left */
    background: none repeat scroll 0 0 rgba(204, 87, 166, 0.6);
    left: -90%;
    top: 0;
  }
  div.multi-hover span:nth-child(4) { /* bottom */
    background: none repeat scroll 0 0  rgba(97, 181, 115, 0.6);
    left: 0;
    top: 80%;
  }

  div.multi-hover span:hover {opacity: 1;}
  div.multi-hover span:nth-child(2n+1):hover {left: 0;}
  div.multi-hover span:nth-child(2n):hover {top: 0;}

</style>
Step 4. Save the Template

Now we are going to add the HTML that is nothing but a DIV where we included four SPAN tags with texts and an image:

Step 5. Choose Posts, create a New Post, click on the HTML tab (1) and paste this code inside the empty box:
<div class=multi-hover>
  <span>hover right</span>
  <span>hover top</span>
  <span>hover left</span>
  <span>hover bottom</span>
  <img src="https://blogger.googleusercontent.com/img/b/R29vZ2xl/AVvXsEgRyLhT8uMEaLG_8cKSJpau6VqlIx53SIzifDDZbsBYA3H8T5mmkehWB9dJAXQoeuvpS_TbXMG0H5rOp4Aoy-KdPRv-17ZEa2Xb7FtbI1bMPIoq4wVWfFH9N70KWP19318AFshVAjUnx1o/s1600/flowers">
</div>
Add your own text/description to "hover right", "hover top", "hover left" and "hover bottom" (2) and replace the url in blue with the image URL (3) where you want to apply the effect.
Important! Do not click on the Compose tab, otherwise the changes will be lost.


Step 6. After you finished editing your post, click Publish (4)

And that's it... enjoy! :)

Using the :before and :after Pseudo Elements on Sidebar Titles

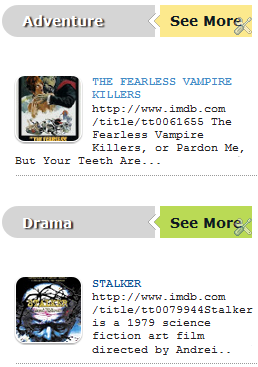
This is another method of using the :after and :before properties and it will work without too many problems in any browser, including IE8. What this trick will do is to divide the header bar into left and right sections, where the left will contain an explanatory title and the right, a related link.

The idea of generating Adobe-like Arrow Headers was actually discussed by css-tricks and adapted to Blogger.

How to Add Adobe-like Headers to Blogger

blogger gadgets, blogger tricks, blogger blogspot

Step 1. Log in to your Blogger dashboard > go to Template > Edit HTML, then click anywhere inside the code area to search - using the CTRL + F keys - for the following tag:
</head>
Step 2. Just above it, copy and paste this code:
 <style>
.module h2 {
  background-color: #D5D5D5;
  border-radius: 20px 0 0 20px;
  color: #FFFFFF;
  font-family: Verdana;
  font-size: 14px;
  line-height: 32px;
  margin: 0;
  padding: 0 0 0 20px;
  text-shadow: 2px 1px 1px #222;
}

.module h2 a {
    border-left: 5px solid #ffffff;
    color: #101921;
    float: right;
    font-size: 14px;
    text-decoration: none;
    text-shadow: none;
    padding: 0 10px;
    position: relative;
   -moz-transition: padding 0.1s linear;
   -webkit-transition: padding 0.1s linear;
   -ms-transition: padding 0.1s linear;
   -o-transition: padding 0.1s linear;
}
.module h2 a:hover {
  padding: 0 32px;
}

.module h2 a:before, .module h2 a:after {
    content: &quot;&quot;;
    height: 0;
    position: absolute;
    top: 50%;
    width: 0;
}
.module h2 a:before {
    border-bottom: 8px solid transparent;
    border-right: 8px solid #ffffff;
    border-top: 8px solid transparent;
    left: -12px;
    margin-top: -8px;
}
.module h2 a:after {
    border-bottom: 6px solid transparent;
    border-top: 6px solid transparent;
    left: -6px;
    margin-top: -6px;
}

.module.blue h2 a {background-color: #A2D5EC;}
.module.blue h2 a:hover {background-color: #C5F0FF;}
.module.blue h2 a:after {border-right: 6px solid #A2D5EC;}
.module.blue h2 a:hover:after {border-right-color: #C5F0FF;}

.module.yellow h2 a {background-color: #FCE98D;}
.module.yellow h2 a:hover {background-color: #FFD700;}
.module.yellow h2 a:after {border-right: 6px solid #FCE98D;}
.module.yellow h2 a:hover:after {border-right-color: #FFD700;}

.module.green h2 a {background-color: #bada55;}
.module.green h2 a:hover {background: #C7E176;}
.module.green h2 a:after {border-right: 6px solid #bada55;}
.module.green h2 a:hover:after {border-right-color: #C7E176;}

.module.red h2 a {background-color: #F0A5B5;}
.module.red h2 a:hover {background-color: #FFC7D2;}
.module.red h2 a:after {border-right: 6px solid #F0A5B5;}
.module.red h2 a:hover:after {border-right-color: #FFC7D2;}
</style>
Step 3. Save the Template.

Screenshot:


Step 4. Now go to Layout and Add a new HTML/JavaScript Gadget with one of the codes below for each of the widget title:

Background in blue:
<div class="module blue">
<h2>Title in <a href="Link URL">Blue</a></h2>
</div>
Background in yellow:
<div class="module yellow">
<h2>Title in <a href="Link URL">Yellow</a></h2>
</div>
Background in green:
<div class="module green">
<h2>Title in <a href="Link URL">Green</a></h2>
</div>
Background in red:
<div class="module red">
<h2>Title in <a href="Link URL">Red</a></h2>
</div>

Note: Change "Title in" text with your widget's title and Blue, Yellow, Green and Red with the text on the right, then add a Link URL to it.
Step 5. After you saved the HTML/Javascript gadgets containing the codes above, drag and drop them just above the widgets you want to show... and Save the Arrangement.
blogger tricks, blogger tutorials

DEMO

You can see how the sidebar titles has been replaced with some cool header bars on this demo blog.

How To Use The New Blogger HTML Editor

The Blogger template editor now includes a number of changes that seem interesting and make it much more friendly than it was.

To begin with, what we see now is all the template's code starting with numbered and colored lines showing us different code snippets: tags, variables, properties, etc.. depending on the HTML, CSS, JavaScript and even the language of Blogger - include, b:if and other occurrences.

blogger template, blogger tricks, blogger widgets

This is what any decent external editor does, but certainly, from now on it will be much easier to find that little bug that drives us crazy when we omit quotation marks or add one more semicolon. This also applies to CSS, which appears mostly in dark blue without distinguishing selectors and rules, but the rest is a major improvement.
Another great help are the numbers that appear in front of each fragment of code, so that we can easily pinpoint and correct errors of this type: "Error parsing XML, line 103, column 9: The element ... "

Using the New Blogger Template HTML Editor

When you want to search for a code in the HTML editor, click inside the editor and press CTRL + F on your keyboard, then enter what you want to find in the search box that appears inside the editor.


Finally, hit the "ENTER" button on your keyboard and it should take you to the requested code.

If you want to be taken to the section of code that belongs to a particular widget, just click on the Jump To Widget button at the top of the editor, choose the widget's name from the list and it will take you directly to that portion of code.


The CSS rules can be found folded at the top of the template, between <b:skin>...</b:skin> and <b:template-skin>...</b:template-skin> tags. To expand them, you have to click on the sideways arrow next to the line number.


Another great functionality is that now we can Preview Template in the same window without needing to leave the page and we can easily go back to customize our template by clicking on the Edit Template button.

Finally, Format template re-orders the code, adding indentation automatically.

As always, we must use the Save button for the changes to take effect or we can Revert the changes.

And that's it. With a bit of effort, we can easily familiarize with this new HTML editor. Surely as usual and even reasonable to be something inherent in the human condition, this change does not appeal to many. Same with the Lightbox for images, the new template designer, the new desktop and other new things that have been added in the past. But who now remembers that they once were new?
----------
For more info, check out this post on the Blogger Buzz blog, where Google software engineers +Samantha Schaffer and +Renee Kwang explained the steps for moving the date of a blog post from above the post title to underneath it, as an example in using the new Blogspot HTML editor.