Saturday, June 1, 2013

Google adsense optimization tips


What is Google AdSense? 

Google AdSense is a free program run by Google that allows you to display Google adverts on your blog/website and pays you everytime someone clicks on one of these ads. Just submit your blog to Google for approval and after your content has been approved, you are ready to place AdSense ads on your website.  But beware, Google AdSense doesn't approve any sites! According to AdSense policy you are not allowed to do the following things:

1) Do not click on your own AdSense ads by any way.
2) Do not increase AdSense ad impressions with some automating tools.
3) Don’t ask others to click on your ads.
4) Don’t alter the AdSense code other than fonts and colors.
5) Don’t put AdSense code on adult or prohibited content.

Some basic optimization tips can double your AdSense revenue, so i've added a list of some of the best Google Adsense Tips and Tricks for making more money from the Google Adsense program.

Tips to Increase Google AdSense Earnings

1) Place the Adsense ads above the main fold that user can see your ad units without scrolling down on your site. This will increase your Ads Click Through Rate (CTR)

Because browsers and screen sizes vary, Google has created a nice tool that allows you to enter any URL, and check whether you've implemented your ads above the fold.

2) The best performing ad units for AdSense are:

250×250 Square
160×600 wide skyscraper
336×280 large rectangle
300×250 medium rectangle

Use them wisely. I suggest you to place 250 x 250 size ad units at the top of every post and align it at the right or left side of the post content. The 160×600 ad format can easily fit in the sidebar of your blogger blog.

3) You can use the following “heat map” provided by Google to analyze other top performing ad placement slots. You should concentrate on the areas with darker orange color which represents the hot spots of the ads slots. (see in the image below)

blogger blog, what is adsense, google analytics

4) Text ads are good for the first Google Ad unit. I also recommend you to place a 300×250 unit in the sidebar (or somewhere below the fold) – these generally serve CPM based ads and will help you monetize visits from places like Digg and StumbleUpon.

5) Ads placed in-between the content can also perform well. If you have small posts then put ads at the top of the page content. If you have big post then ad units placed at the bottom or middle of the post.

6) Do not use borders to your text ads or use them wisely.

7) To blend, choose the colors that match with the colors of your website: for example if your site background is black, you will put the same background for your Adsense ads. If your links are blue, then select the color blue for Adsense links. If your titles are red, then make your Adsense block titles red.

8) To complement, use colors that already exist on your site, but don't match the background and borders exactly where the ads are placed.

9) To contrast, choose colors that stand out against the background of your site. Contrasting is recommended only for sites with dark background, so we suggest using an ad style with white background, white borders, and blue titles. (google hints)

10) Use link units near the site navigation bar. The main advantages of this placement, are that they can perform well and you don't need too much Ad space on your site. This way, your site looks clean and also, your visitors will be annoyed.

11) Study your keywords and the target ads to these keywords. Usually, Google Adsense crawler searches for the first or second paragraph to target ads to that page so don't forget to add your page-targeted keywords at the beginning of your post.

12) MFA (made for AdSense) sites are websites created around AdSense keywords, and often, these are poor quality sites with little or no original content. Use Allow and block ads feature to block low paying or irrelevant ads showing on your site. And be careful when you're doing this, sometimes one ad unit can give you $0.01 in one country and $1 in other country.

13) Use Google Adsense ad preview tool to view what ads are showing on your site.

14) Many times you can earn you more AdSense revenue from Image search engines than with the regular web traffic. Upload good quality images and use text captions with alt tags to make sure that blog images rank good in Image Search results.

15) Add a search box at the top left region of your blog and use the word "search" in the submit button otherwise visitors might be confused and might not notice it. If you use a second search box, put it at the bottom of your pages.

If you have any other suggestions, write a comment below.
Good luck!

How to Add Google Analytics in Blogger?

Once you setup your blog and start publish quality content, its time to track the traffic statistics to know more about the visitors that who are visiting your blog, from where they are, how much time they spend on your blog etc. Google Analytics is the best tool provided by Google to easily track and check real and accurate stats of our blog traffic. Except this you can also check your blog’s bounce rate, unique visitors, page views and visits by adding Google Analytics to your blog. Tracking the traffic statistics of blog is very important if you want to know that what’s going on your blog and the behavior of your visitors. Now you are aware with the benefits of installing GA in blog so let’s see how to install it.

Create Google Analytics Account

Before adding GA tracking code to your blog you need a GA account. Follow below steps:
  1. Go to Google Analytics.
  2. Now sign in with your Google or Gmail account.
  3. Click on “Sign Up” button on the next page.
  4. Google Analytics Sign up
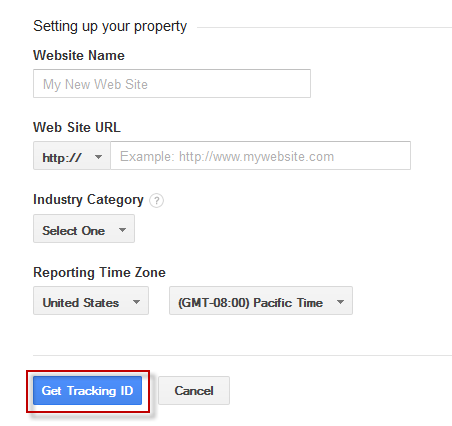
  5. Once you click the sign up button you will redirect to next page there you have to fill a simple form by entering your Blog Title, URL, your Country, Blog Category and Account name. You can enter your blog title as your account name or can choose anything else which helps you to recognize your blog. See below screenshot for complete process.
  6. Setting Up Your Web Property
  7. Once you fill all the details click on “Get Tracking ID” button.
  8. Now click on “I Accept” on “GOOGLE ANALYTICS TERMS OF SERVICE” pop up page.
  9. If everything is fine then you will get a Tracking ID like “UA-39654221-1″ at the top left corner and a Tracking code in a box. Now let’s go to the next step.

Add Google Analytics to Blogger

To add GA in your blog you have to perform 2 steps. First you have to add your Tracking ID in blogger settings and then put the tracking code in your template.
Adding Google Analytic ID to Blogger
  1. Go to Blogger >> Settings >> Other
  2. Now under the “Analytics Web Property ID” enter your Tracking ID in the text field.
  3. Tracking ID
  4. Click on “Save Settings” button.
Adding Tracking Code
  1. Go to Blogger >> Template >> Edit HTML
  2. Backup your blog template.
  3. Now search for
  4. And paste your Tracking Code just above it.
  5. Save the template.
  6. You are done!
Now you have completed all the process of installing and adding Google Analytics in blogger. It will take approx 24 hours to show your traffic report in Google Analytics. Happy Blogging!

Thursday, May 30, 2013

Increase Your Blog Readership More Effectively


If you are a regular reader of this blog, then you might be aware that I have shared lots of tips and tricks to improve blog performance and ranking. My earlier posts focus on some best and working ways to increase traffic to new blog, blog page views, increase blog followers, email subscribers, increase number of comments on blog posts etc. All those ways also work best to build blog readership. Today, I want to grab your attention on a tip that suited best to improve readership around blog. I have tested this tip on my blog and really got amazing results. Lets learn about this tip in detail.

How to Increase Blog Readership?

If you are new on this blog, then I strongly recommend you to read my earlier posts that work awesome to improve readership around our blog. You’ll surely get productive results for your blog. Please check below articles.
Now let’s focus on today’s tip to build solid readership.
Do you ever heard about Roundup Posts? If no, then let me explain you what are these and how they are beneficial for improving our blog readership.
Roundup posts are simply the compilation of other posts that comes under same topic.
For example: In one of my earlier post, I shared a roundup post that was not based on any new topic. It was just a collection of some other posts that comes under the same category of Blogger SEO Tips. Check below link for more clear idea.
So, now you are properly aware with the concept of roundup posts. It’s time to learn that how they can help us to increase our blog readership. Below are some points that will help you to understand the benefits of roundup posts.
Blog Readership

1# Attract New Visitors

Sometime it happen that new visitors land on our blog. They are new, that means they are not aware with our previously published posts. In that case, roundup posts works awesome to attract them towards our other posts. They spend more time on our blog to read more content. This will also help us to decrease our blog bounce rate.

2# Increase Blog Comments

These types of posts will be a recap for our regular readers. If they have missed our previous posts due to any reason, then we can expect a handful of valuable comments on our old posts. It’ll also help us to increase our blog comments.

3# Internal Linking

Roundup posts play a vital role to build solid internal linking between our blog posts. We just need to keep importance of using anchor text correctly in our mind to optimize our internal links.
Optimized internal links will help us to maintain our blog readership. Read below article to know the role of internal linking in better readership.

4# Increase Blog Page Views

I like this point the most. Such posts are really helpful to increase blog page views. We can definitely notice an instant spike in our traffic stats. Our regular page views will increase by publishing such type of posts.
So, these are the top 4 benefits on roundup posts in blog readership. Let see how to choose posts to make such compilation more SEO friendly and interesting.

How to Choose Posts for Roundup?

We should compile those posts that come under same category. It’ll be best to choose those posts which cover the same topic so that our roundup post become more keyword rich and detailed on particular topic. These types of posts easily get high ranking in search results.
Below is the list of all roundup posts that I have made till yet on this blog. Please take a look at all of them. It’ll help you more to choose your blog posts in a better way for making roundup of them.
Final Words!
This was the today’s tip on how to increase readership of your blog. I must recommend you to compile and publish such a post in your blog and notice the increment in your blog page views. It’ll be productive for you.
Please do let me if it creates any difference for you or not? Wish you best of luck for your blogging success. Happy Blogging!

Wednesday, May 29, 2013

Adding a Youtube Video in the Background of a Blogger blog

Some of you might have wondered how to put a video to play in the blog's background, so that instead of having just a color or an image, to have a video. We can do this thanks to the jQuery plugin Tubular that lets you use a YouTube video as a background of a web page.

Although the result can be very original and attractive, I must say it has three drawbacks: they can not be silenced, if the video has ads, they will also appear, and it can slow the loading time of the blog, so if anyone wants to use it, may consider putting it only on special occasions, or on blogs that load very quickly.
Also it can be done in HTML5, the problem with this method is that you need to load the video in 3 different formats (.mp4, .webm and .ovg) along with a picture for browsers that do not support them, so this YouTube option seems more practical to me, despite the drawbacks.

blogger gadgets, blogger tricks, blogger widgets

You can see it working on this demo blog

Steps 

1. The first step is to just above the </head> tag, this script:
<script src='http://ajax.googleapis.com/ajax/libs/jquery/1.10.2/jquery.min.js' type='text/javascript'/>

<script type='text/javascript'>
//<![CDATA[
/* jQuery tubular plugin
|* by Sean McCambridge
|* http://www.seanmccambridge.com/tubular
|* Copyright 2012
|* licensed under the MIT License
|* Enjoy.
|*
|* Thanks,
|* Sean */

var videoWidth = 853;
var videoRatio = 16/9;
var defaultDiv = 'wrapper-video';

jQuery.fn.tubular = function(videoId,wrapperId) {
wrapperId = (typeof(wrapperId) == undefined) ? 'wrapper-video' : wrapperId;
t = setTimeout("resizePlayer()",1000);

jQuery('html,body').css('height','100%');
jQuery('body').prepend('<div id="yt-container" style="overflow: hidden; position: fixed; z-index: 1;"><div id="ytapiplayer">You need Flash player 8+ and JavaScript enabled to view this video.</div></div><div id="video-cover" style="position: fixed; width: 100%; height: 100%; z-index: 2;"></div>');
jQuery('#' + wrapperId).css({position: 'relative', 'z-index': 99});

var ytplayer = 0;
var pageWidth = 0;
var pageHeight = 0;
var videoHeight = videoWidth / videoRatio;
var duration;

var iframe = '<iframe id="myytplayer" width="' + videoWidth + '" height="' + videoHeight + '" src="http://www.youtube.com/embed/' + videoId + '?autoplay=1&controls=0&modestbranding=1&showinfo=0&hd=1&iv_load_policy=3&version=3&wmode=transparent&loop=1&playlist=' + videoId + '" frameborder="0" allowfullscreen></iframe>';

jQuery('#ytapiplayer').html(iframe);
jQuery(window).resize(function() {
resizePlayer();
});
return this;
}

function onYouTubePlayerReady(playerId) {
ytplayer = document.getElementById("myytplayer");
ytplayer.setPlaybackQuality('medium');
ytplayer.mute();
}

function resizePlayer() {
var newWidth = jQuery(window).width();
var newHeight = jQuery(window).height();
jQuery('#yt-container, #video-cover').width(newWidth).height(newHeight);
if (newHeight > newWidth / videoRatio) {
newWidth = newHeight * videoRatio;
}
jQuery('#myytplayer').width(newWidth).height(newWidth/videoRatio);
}

//]]>
</script>
And this one too:
<script type='text/javascript'>
//<![CDATA[
$().ready(function() {
$('body').tubular('61BLn00AN_w','wrapper-video');
});
//]]>
</script>
2. Then locate the <body> tag (CTRL + F)
Or if you are using a template from Template Designer, find this line:
<body expr:class='&quot;loading&quot; + data:blog.mobileClass'>
3. Under either of these two, add this:
<div id='wrapper-video'>
4. Now search for the </body> tag, and before it put this:
</div>
Save the changes and that's it. In red you must put the ID of Youtube video, the ID are the characters that appear at the end of the URL:


Remember: There is no option to mute, so if you don't want to have sound as in the demo blog, you have to choose a video that has no sound. I also recommend using a video in HD in case you don't want any black parts to show around it.

If you are using jQuery, remove other versions that you have to avoid duplication and have problems.

Sunday, May 26, 2013

How to Add Google Analytics to Blogger

Google Analytics is a platform created with the purpose of helping us to track the number of visits and page views on our blog, which also uses several filters to check exactly from where the visitors are coming via standard or custom reports.

Google Analytics is the leading free tool that has a good relationship with the internet marketing and offers suggestions and improvements or benefits for our website.

As Analytics is part of the variety of Google tools like Blogger, many bloggers still don't know if it is possible to add the tracking code in Blogger. Implementing analytics in Blogger is very quick and easy, so you don't need to be experts or web developers. Here's a small guide for placing the Google Analytics tracking ID on our blog.

google analytics

Implementing Google Analytics on Blogger


1. Do you have a Google Analytics account? Then it's perfect. If you don't have one, please Register.
2. Within the account, we'll go to Admin and in the Property column, click the menu, then click Create new property, where we enter the information from the website.

create new property in google analytics

3. Click on "Get Tracking ID" and it will provide a box with a code, select and copy the code (CTRL + C).

get google analytics tracking id

4. Now let's go to our Blogger account.
5. Look for your blog and click on it, then go to Template > click the Edit HTML button and paste the code previously generated in Analytics before the </head> tag (CTRL + F in order to find it).
And this would be the entire procedure. Within about 24 hours, we shall see the first statistics of our blog in Google Analytics, otherwise check the following:

- Double check that the code has no spaces or characters.
- Doesn't have errors in the configuration
- There are no poor implementation of the filters.
- The Flash plugin is working or javascript is enabled.
- You will have minor issues if you are receiving visits from China (this conflict is not yet solved, according to Google).

4 Alternatives to Google AdWords

Many think that Google AdWords is the only tool dedicated and available to perform a study such as a keyword search, but it isn't so, today I refute this idea by collecting some alternatives that, although are not equal to Google AdWords, at least encourage us to make good keyword analysis for the SEO of our website.


Going back a bit, for those unfamiliar with the main features and tools of Google AdWords, we can find a very simple interface yet complete in every sense.

- AdWords appearance has changed, however there is a chance of returning to the old design;
- allows you to place a phrase or keyword, a web site and use the categories;
- for a better keywords search, you can apply filters such as location, language and add custom fields (competition, local or global monthly searches, CPC, Ad share, etc.);
- displays keyword ideas in columns with the amount of local and global monthly searches and approximate CPC;
- you can download keyword ideas, search results in a format to open with Excel.

Having recalled and refreshed the memory a little with the characteristics of AdWords, now it is time to learn about other options both free and paid.

Google AdWords Alternatives


Bing Webmaster Tools: Bing may not be the tool that we had first thought of, however it wants to provide the best conditions for studying keywords.


After we register, to access the tool, go to Diagnostics & Tools and click on the second option on the list: Keyword Research.

SEMRush: Other freemium alternative that displays a very complete report of a particular keyword or website. However, it has limitations and if you opt for a PRO recurring plan you need to pay a monthly membership from $69.95 per month.

Ubersuggest: This nice and simple online tool searches keywords suggestion as well as potential titles for an article. Personally, I recommend it 100%.

Keyword Eye: If you are looking to perform a keyword research on a particular region, Keyword Eye will be your help. It also has the option of requesting the display of search volume or AdWords competition and a full report of anchor text, keywords and domain.

At first it offers a free plan with limitations and to enjoy all other benefits, we have to pay $9.99 per month.

How to Add a Recent Forum Topics Widget to Blogger

If you are using the Nabble forum in your blog is very likely that this gadget will interest you because, as the title suggests, it will display the lastest topics that have been published in your forum in a very similar manner to the recent comments gadget that works with the blog's feed.

If you want to add a list with the Recent Forum Topics then follow the steps below:

Go to your forum and look at the bottom where it says Feeds, click on that link and then two links of the Feed will appear (the first being the Topics only Feed and the other one is Topics and replies) - choose the one you want.
using nabble feeds to see latest forum topics

After this, log in to your Blogger Dashboard, go to Layout, click on Add a Gadget link, choose Feed from the gadgets list and paste the Feed URL you have selected inside the text box.

configure gadget feed in blogger

Click on Continue, and you only have to configure the parameters, then Save changes to see the results.

That's it! Enjoy :)