Thursday, May 30, 2013

Increase Your Blog Readership More Effectively


If you are a regular reader of this blog, then you might be aware that I have shared lots of tips and tricks to improve blog performance and ranking. My earlier posts focus on some best and working ways to increase traffic to new blog, blog page views, increase blog followers, email subscribers, increase number of comments on blog posts etc. All those ways also work best to build blog readership. Today, I want to grab your attention on a tip that suited best to improve readership around blog. I have tested this tip on my blog and really got amazing results. Lets learn about this tip in detail.

How to Increase Blog Readership?

If you are new on this blog, then I strongly recommend you to read my earlier posts that work awesome to improve readership around our blog. You’ll surely get productive results for your blog. Please check below articles.
Now let’s focus on today’s tip to build solid readership.
Do you ever heard about Roundup Posts? If no, then let me explain you what are these and how they are beneficial for improving our blog readership.
Roundup posts are simply the compilation of other posts that comes under same topic.
For example: In one of my earlier post, I shared a roundup post that was not based on any new topic. It was just a collection of some other posts that comes under the same category of Blogger SEO Tips. Check below link for more clear idea.
So, now you are properly aware with the concept of roundup posts. It’s time to learn that how they can help us to increase our blog readership. Below are some points that will help you to understand the benefits of roundup posts.
Blog Readership

1# Attract New Visitors

Sometime it happen that new visitors land on our blog. They are new, that means they are not aware with our previously published posts. In that case, roundup posts works awesome to attract them towards our other posts. They spend more time on our blog to read more content. This will also help us to decrease our blog bounce rate.

2# Increase Blog Comments

These types of posts will be a recap for our regular readers. If they have missed our previous posts due to any reason, then we can expect a handful of valuable comments on our old posts. It’ll also help us to increase our blog comments.

3# Internal Linking

Roundup posts play a vital role to build solid internal linking between our blog posts. We just need to keep importance of using anchor text correctly in our mind to optimize our internal links.
Optimized internal links will help us to maintain our blog readership. Read below article to know the role of internal linking in better readership.

4# Increase Blog Page Views

I like this point the most. Such posts are really helpful to increase blog page views. We can definitely notice an instant spike in our traffic stats. Our regular page views will increase by publishing such type of posts.
So, these are the top 4 benefits on roundup posts in blog readership. Let see how to choose posts to make such compilation more SEO friendly and interesting.

How to Choose Posts for Roundup?

We should compile those posts that come under same category. It’ll be best to choose those posts which cover the same topic so that our roundup post become more keyword rich and detailed on particular topic. These types of posts easily get high ranking in search results.
Below is the list of all roundup posts that I have made till yet on this blog. Please take a look at all of them. It’ll help you more to choose your blog posts in a better way for making roundup of them.
Final Words!
This was the today’s tip on how to increase readership of your blog. I must recommend you to compile and publish such a post in your blog and notice the increment in your blog page views. It’ll be productive for you.
Please do let me if it creates any difference for you or not? Wish you best of luck for your blogging success. Happy Blogging!

Wednesday, May 29, 2013

Adding a Youtube Video in the Background of a Blogger blog

Some of you might have wondered how to put a video to play in the blog's background, so that instead of having just a color or an image, to have a video. We can do this thanks to the jQuery plugin Tubular that lets you use a YouTube video as a background of a web page.

Although the result can be very original and attractive, I must say it has three drawbacks: they can not be silenced, if the video has ads, they will also appear, and it can slow the loading time of the blog, so if anyone wants to use it, may consider putting it only on special occasions, or on blogs that load very quickly.
Also it can be done in HTML5, the problem with this method is that you need to load the video in 3 different formats (.mp4, .webm and .ovg) along with a picture for browsers that do not support them, so this YouTube option seems more practical to me, despite the drawbacks.

blogger gadgets, blogger tricks, blogger widgets

You can see it working on this demo blog

Steps 

1. The first step is to just above the </head> tag, this script:
<script src='http://ajax.googleapis.com/ajax/libs/jquery/1.10.2/jquery.min.js' type='text/javascript'/>

<script type='text/javascript'>
//<![CDATA[
/* jQuery tubular plugin
|* by Sean McCambridge
|* http://www.seanmccambridge.com/tubular
|* Copyright 2012
|* licensed under the MIT License
|* Enjoy.
|*
|* Thanks,
|* Sean */

var videoWidth = 853;
var videoRatio = 16/9;
var defaultDiv = 'wrapper-video';

jQuery.fn.tubular = function(videoId,wrapperId) {
wrapperId = (typeof(wrapperId) == undefined) ? 'wrapper-video' : wrapperId;
t = setTimeout("resizePlayer()",1000);

jQuery('html,body').css('height','100%');
jQuery('body').prepend('<div id="yt-container" style="overflow: hidden; position: fixed; z-index: 1;"><div id="ytapiplayer">You need Flash player 8+ and JavaScript enabled to view this video.</div></div><div id="video-cover" style="position: fixed; width: 100%; height: 100%; z-index: 2;"></div>');
jQuery('#' + wrapperId).css({position: 'relative', 'z-index': 99});

var ytplayer = 0;
var pageWidth = 0;
var pageHeight = 0;
var videoHeight = videoWidth / videoRatio;
var duration;

var iframe = '<iframe id="myytplayer" width="' + videoWidth + '" height="' + videoHeight + '" src="http://www.youtube.com/embed/' + videoId + '?autoplay=1&controls=0&modestbranding=1&showinfo=0&hd=1&iv_load_policy=3&version=3&wmode=transparent&loop=1&playlist=' + videoId + '" frameborder="0" allowfullscreen></iframe>';

jQuery('#ytapiplayer').html(iframe);
jQuery(window).resize(function() {
resizePlayer();
});
return this;
}

function onYouTubePlayerReady(playerId) {
ytplayer = document.getElementById("myytplayer");
ytplayer.setPlaybackQuality('medium');
ytplayer.mute();
}

function resizePlayer() {
var newWidth = jQuery(window).width();
var newHeight = jQuery(window).height();
jQuery('#yt-container, #video-cover').width(newWidth).height(newHeight);
if (newHeight > newWidth / videoRatio) {
newWidth = newHeight * videoRatio;
}
jQuery('#myytplayer').width(newWidth).height(newWidth/videoRatio);
}

//]]>
</script>
And this one too:
<script type='text/javascript'>
//<![CDATA[
$().ready(function() {
$('body').tubular('61BLn00AN_w','wrapper-video');
});
//]]>
</script>
2. Then locate the <body> tag (CTRL + F)
Or if you are using a template from Template Designer, find this line:
<body expr:class='&quot;loading&quot; + data:blog.mobileClass'>
3. Under either of these two, add this:
<div id='wrapper-video'>
4. Now search for the </body> tag, and before it put this:
</div>
Save the changes and that's it. In red you must put the ID of Youtube video, the ID are the characters that appear at the end of the URL:


Remember: There is no option to mute, so if you don't want to have sound as in the demo blog, you have to choose a video that has no sound. I also recommend using a video in HD in case you don't want any black parts to show around it.

If you are using jQuery, remove other versions that you have to avoid duplication and have problems.

Sunday, May 26, 2013

How to Add Google Analytics to Blogger

Google Analytics is a platform created with the purpose of helping us to track the number of visits and page views on our blog, which also uses several filters to check exactly from where the visitors are coming via standard or custom reports.

Google Analytics is the leading free tool that has a good relationship with the internet marketing and offers suggestions and improvements or benefits for our website.

As Analytics is part of the variety of Google tools like Blogger, many bloggers still don't know if it is possible to add the tracking code in Blogger. Implementing analytics in Blogger is very quick and easy, so you don't need to be experts or web developers. Here's a small guide for placing the Google Analytics tracking ID on our blog.

google analytics

Implementing Google Analytics on Blogger


1. Do you have a Google Analytics account? Then it's perfect. If you don't have one, please Register.
2. Within the account, we'll go to Admin and in the Property column, click the menu, then click Create new property, where we enter the information from the website.

create new property in google analytics

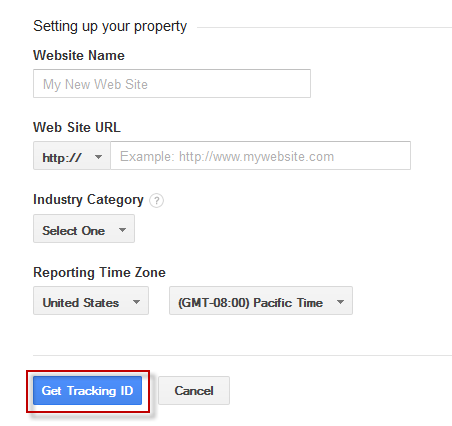
3. Click on "Get Tracking ID" and it will provide a box with a code, select and copy the code (CTRL + C).

get google analytics tracking id

4. Now let's go to our Blogger account.
5. Look for your blog and click on it, then go to Template > click the Edit HTML button and paste the code previously generated in Analytics before the </head> tag (CTRL + F in order to find it).
And this would be the entire procedure. Within about 24 hours, we shall see the first statistics of our blog in Google Analytics, otherwise check the following:

- Double check that the code has no spaces or characters.
- Doesn't have errors in the configuration
- There are no poor implementation of the filters.
- The Flash plugin is working or javascript is enabled.
- You will have minor issues if you are receiving visits from China (this conflict is not yet solved, according to Google).

4 Alternatives to Google AdWords

Many think that Google AdWords is the only tool dedicated and available to perform a study such as a keyword search, but it isn't so, today I refute this idea by collecting some alternatives that, although are not equal to Google AdWords, at least encourage us to make good keyword analysis for the SEO of our website.


Going back a bit, for those unfamiliar with the main features and tools of Google AdWords, we can find a very simple interface yet complete in every sense.

- AdWords appearance has changed, however there is a chance of returning to the old design;
- allows you to place a phrase or keyword, a web site and use the categories;
- for a better keywords search, you can apply filters such as location, language and add custom fields (competition, local or global monthly searches, CPC, Ad share, etc.);
- displays keyword ideas in columns with the amount of local and global monthly searches and approximate CPC;
- you can download keyword ideas, search results in a format to open with Excel.

Having recalled and refreshed the memory a little with the characteristics of AdWords, now it is time to learn about other options both free and paid.

Google AdWords Alternatives


Bing Webmaster Tools: Bing may not be the tool that we had first thought of, however it wants to provide the best conditions for studying keywords.


After we register, to access the tool, go to Diagnostics & Tools and click on the second option on the list: Keyword Research.

SEMRush: Other freemium alternative that displays a very complete report of a particular keyword or website. However, it has limitations and if you opt for a PRO recurring plan you need to pay a monthly membership from $69.95 per month.

Ubersuggest: This nice and simple online tool searches keywords suggestion as well as potential titles for an article. Personally, I recommend it 100%.

Keyword Eye: If you are looking to perform a keyword research on a particular region, Keyword Eye will be your help. It also has the option of requesting the display of search volume or AdWords competition and a full report of anchor text, keywords and domain.

At first it offers a free plan with limitations and to enjoy all other benefits, we have to pay $9.99 per month.

How to Add a Recent Forum Topics Widget to Blogger

If you are using the Nabble forum in your blog is very likely that this gadget will interest you because, as the title suggests, it will display the lastest topics that have been published in your forum in a very similar manner to the recent comments gadget that works with the blog's feed.

If you want to add a list with the Recent Forum Topics then follow the steps below:

Go to your forum and look at the bottom where it says Feeds, click on that link and then two links of the Feed will appear (the first being the Topics only Feed and the other one is Topics and replies) - choose the one you want.
using nabble feeds to see latest forum topics

After this, log in to your Blogger Dashboard, go to Layout, click on Add a Gadget link, choose Feed from the gadgets list and paste the Feed URL you have selected inside the text box.

configure gadget feed in blogger

Click on Continue, and you only have to configure the parameters, then Save changes to see the results.

That's it! Enjoy :)

Friday, May 24, 2013

How to Write SEO Optimized Blog Posts


I'm not a SEO Expert, nor what we will read further is a top secret, but this is about the basic positioning that everyone should apply in order to optimize their blog posts. And with these techniques, effort, and a lot of patience, we can occupy the best places in the search results of different search engines.

For sure not all the cases are alike, neither all blogs are positioned in the same manner, some might have greater competition than others depending on how popular is the topic that they handle, thus, when it comes to web positioning, there's no specific time that applies for all. Having said this, let's begin.

Focus on a topic

Whatever the theme of your blog is, when writing a post, try focusing on a definite subject that has a clear objective and has no distractions. For example, if you write about Digital Cameras, then the beginning and the end of the post should be only about it. Don't start talking about digital cameras and end up telling about what you have done last weekend. A reader goes to a page because is looking for a specific information, so unless it is not a personal blog (where you write about your daily life) do not digress.

Define the post title


The post title should be precise, so that you can briefly summarize the content of the post, but you must not abuse this either, and although it should be concise, do not save words that might be keys to the search.

Examples:
Collection of all the cameras that have been released last year on the market
The best digital cameras of 2012
Clearly, the first one hasn't been defined very much and the second is not only more accurate but it is more appropriate as well, for what people are searching on the internet.

The keywords


Keywords are those terms that the most people search for on the internet and you should try focusing on them when writing an article; these keywords have to be included throughout the entire article but you should be careful not repeating them too many times.

Example:
During the fourth week of the technology, there were many products that are utilized today, and the most famous experts gave a speech on them.
At the opening of the fourth Technology Week, the experts talked about various topics, including how to choose a digital camera, had discussions about the pros and cons of the iPad, and which are the best smartphones.
In the first example we have written without giving importance to any terms, meanwhile, in the second one, we used phrases that are searched on the internet by the most users.

So, the most frequent search terms should be included wisely without cluttering your posts with them, or it can be counterproductive.

These keywords should be added in the title of the posts, as well.

Rely on synonyms


While it is good using keywords, we should not limit ourselves to a single word. It is recommended using synonyms because users do not name things in same way and using less keywords, you'll avoid leaving the reader under the impression that you are being repetitive and insistent.

Examples:
For those who like good quality pictures, Nikon D7000s Digital Camera is a 16.2 megapixel digital camera that takes great pictures.
For those who like good quality images, Nikon D7000s is a 16.2 megapixel digital camera that takes excellent pictures.

In the first example we have repeated the word digital camera and pictures twice, meanwhile, in the second one, we used the digital camera keyword once and changed the word pictures with images.

This way, the reader will find a greater diversity of words and might enjoy the article more.

Using bold and italics


The main keywords should be highlighted, so that they will stand out from the rest; this is taken into account by the search engine robots being like some kind of lures for them, so the words with which you want to position yourself, need to be highlighted with bold, but be careful, this shouldn't be done with CSS, but with HTML, i.e. they should not be tagged with font-weight: bold; but rather with <b> or even better, with <strong>.

Examples:
For those who like good quality images, Nikon D7000s is a 16.2 megapixel digital camera that takes excellent pictures.
The result seems to be the same, but it is not. Although the three sentences are in bold, only one is more attractive to robots, which is the first.
For those who like <span style="font-weight: bold;">good quality images</span>, <strong>Nikon D7000s</strong> is a 16.2 megapixel <b>digital camera</b> that takes excellent pictures.
The same goes for the italics, use them for highlighting important words, but do not put them between font-style: italic; but rather between <i> or even better <em>.
For those who like <span style="font-style: italic;">good quality images</span>, <em>Nikon D7000s</em> is a 16.2 megapixel <i>digital camera</i> that takes excellent pictures.
Again, the first has a better chance of positioning than the others. So, it is recommended to highlight the keywords in bold and italics, or to put them between <strong> and </strong>, or between <em> and </em>.

Using links


Some believe that we shouldn't use links in the posts because this way we are giving away our Page Rank. This is not quite true, using referral links to sites that have already shaped their credibility, will also help us to shape our own. Certainly, we should not flood our posts with links, but we can do it when is necessary and especially with sites that address the same topics as you.

Also, avoid putting the typical "click here" or similar texts. When you put a link, the anchor text should be fairly descriptive.

Examples:
<a href="Link URL">Click here</a> to know more
More information about <a href="Link URL">digital cameras</a>
In the first example, the anchor text is not relevant and descriptive, in the second it is.

Illustrating with images


Articles with images are not only visually appealing, but might help the reader to understand what you are talking about, thus, whenever you can, use an image in your post to illustrate the publishing, but do not overdo it, because many images or very large images can slow the loading time of the blog.

New and relevant content


You should focus not only on writing many posts, but also making them relevant to your readers. New and original content is more attractive to the search engines than a copy & paste and actually, the last gets penalized. So try to write new stuff, even if you think that all has been said, it isn't so, each person has a different way of saying things.

Also, always try to get informed before writing an article; do a research and see if the information is valid, based on that, you will gain the trust of your readers.

With these few techniques you can increase the chances of positioning your posts on the internet. As I said earlier, these aren't things that no one heard about, but I know that many are beginners and don't know how to optimize the blog posts.

It does not hurt repeating that the positioning is not given overnight, but with some effort and patience, you should see the desired results over time.

How to do Directory Submission in SEO?


In my previous post, I shared a trick to check keywords ranking on Google and said to discuss about an amazing tip to build do follow backlinks to improve SERP position. Post Penguin Update, there are many ways you can follow to get quality backlinks for your blog like blog commenting, guest posting, social bookmarking etc. Except these, you can also do Directory Submission to gain quality dofollow backlinks. Using Directory Submission post penguin comes under the safest way to increase link building popularity of blog. Many newbie bloggers find it difficult to understand how to do directory submission for SEO. That’s why today I bring a tutorial to help all those bloggers so that they can learn about directory submission process. But before starting the process, let’s discuss something about web directories and their benefits for SEO.

What are Web Directories?

Before search engines, internet users used to search relevant information on web directories. Directories provide categorized information with best relevancy. But today we have great search engines like Google to search everything in a fast and quick manner.

What is Directory Submission in SEO?

Directory submission is a method to submit blog or website into web directories. It involves steps of adding website URL with site details into most appropriate category.

What is the Use of Directory Submission in SEO?

Directory submission is used to increase website indexing by gaining backlinks from top web directories. Quality backlinks improves our keyword ranking in search engines and help us to increase our blog traffic and page rank.

How to do Directory Submission for SEO?

Doing Directory Submission is not so tough job. Only you have to do is follow below steps one by one.
  1. Go to this Directory Submission Sites List.

  2. Open any site to start doing submission for example Jayde.com.

  3. Choose relevant category for your blog according to your blog niche.

  4. Directory Submission

  5. There are many sub-categories also. So, go in deep as much as possible.

  6. Once you find the most appropriate category for your blog, click on Submit Your Site link at the top right corner.

  7. Submit Your Site

  8. A form will appear to fill. Fill all the details and information about your site like Title, Description, your Email ID etc and submit the form.


  9. You are done!

Final Words

This was the basic process to do directory submission. As same as Social Bookmarking Tips, there are tips for directory submission also. You must care about them to do better SEO for your blog or website. I will discuss those tips into my next tutorial but only when I receive positive response from you and share on social media sites for this post. Stay tuned for part-2 of this tutorial. Happy Blogging.