Saturday, October 12, 2013

How to Add a Vintage Style to Images In Blogger using CSS

To get that vintage Instagram effect for your pictures you don't have to use a program, now you can use CSS and get a similar result! We will apply a shadow inside the image, add a border, put a color in it, and on top of our image, add another semitransparent image with a grunge style that will give a vintage touch.

See an example below: move the mouse pointer onto the image and it changes back to normal - notice that borders remain the same.

vintage images blogger

Obviously there will be images that will fit better these effects than others, but regardless of that we do, there should be made a few observations:

- this effect is made with CSS and it will not recognize some browsers, especially Internet Explorer. So this effect might not work on older versions of IE.
- The images are not centered, you will have to align them to the left (default) or to the right.

Now let's add the CSS code for applying this vintage Instagram effect on our images in our template.

Adding a Vintage Effect to Blogger Images

Step 1. From your Blogger dashboard > go to Template > Edit HTML


Step 2. Click anywhere inside the code area and press the CTRL + F keys to open Blogger' search box

Step 3. Type or paste the following tag inside the search box:
</head>
Step 4. Just above it, add the following CSS style:
<style>
.vintage img {
padding:0;
float:left;
}
.vintage {
border:10px solid #000;
position: relative;
float: left; /* Change to right if you want the images to be aligned to the right */
margin-right: 20px;
margin-bottom: 20px;
}
.vintage:before {
content: "";
display: block;
position: absolute;
top: 0;
bottom: 0;
left: 0;
right: 0;
background-color: rgba(255,102,0, 0.6); /* sepia */
background-image:url(https://blogger.googleusercontent.com/img/b/R29vZ2xl/AVvXsEj6cjp22gH5iE8YSevAlrGewMnK3SqQLgz_j2L9zgLe0Ohu1ejLgMoM85Gr92yspiBVBKf9OTFtr0p8qypNF-8Kh4Ickxm428K3KlVWLycE8kuAGAeFDhXf3rcjBfEyvyGNRnVICepyRGs/s0/grunge.png);
background-size: cover;
box-shadow: inset 0 0 50px #000, inset 0 0 50px #000, inset 0 0 50px #000;
-moz-transition: all 1s;
-webkit-transition: all 1s;
-o-transition: all 1s;
transition: all .1s;
}
.vintage:hover:before {
background: none;
box-shadow:none;
-moz-transition: all 1s;
-webkit-transition: all 1s;
-o-transition: all 1s;
transition: all .1s;
}
</style>
Note: The line in bold that corresponds to the color of the image, can be changed to any other color; here are some examples of traditional vintage:
background-color: rgba(0,0,255, 0.5); /* blue */
background-color: rgba(0,255,0, 0.5); /* green */
background-color: rgba(0,255,255, 0.5); /* cyan */
background-color: rgba(255,0,0, 0.5); /* red */
background-color: rgba(255,0,240, 0.5); /* violet */
If you want the image to not change to its original state on mouse hover, then remove the last code:
.vintage:hover:before {
background: none;
box-shadow:none;
-moz-transition: all 1s;
-webkit-transition: all 1s;
-o-transition: all 1s;
transition: all .1s;
}
Step 5. After you've made your changes, click on Save Template

Step 6. Finally, add the following HTML code inside the HTML part of your posts each time you want to apply the vintage effect to an image:
<div class="vintage">
<img border="0" src="URL of the image" /></div>
<div style="clear: both;"/>
Replace the text in blue with the url of your picture.

And that's it, with this little experiment you can have your vintage-style images using CSS only.

Saturday, October 5, 2013

How to Add a Widget Below First Post in Blogger

This tutorial will show you how to make a gadget/widget to appear just below the first Blogger post.

First, you must understand that the usual gadgets provided by Blogger can be added only where the design section allows this. Yet, we can show any element, for example, an AdSense ad, an image, a flash file or a video etc...

So, what we will do in this tutorial is to display an element under the first post, this means that it will not be visible below the other posts. This is great when you use any automatic summary, although it is not a requirement.

widget below post
This is easy to do and we will use the isFirstPost conditional tag for that element to show it under the first post published on our blog.

Adding A Gadget or Widget Below First Post in Blogger


Step 1. From your Blogger dashboard, go to Template and click on the Edit HTML button:


Step 2. Click anywhere inside the code area and press the CTRL + F keys to open the Blogger search box

blogger search, blogger tutorials

Step 3. Type or paste this line below inside the search box and hit Enter to find it:
<b:include data='post' name='post'/> 
Step 4. Just below it add this code:
<b:if cond='data:post.isFirstPost'>
<div align="center" style="margin:10px auto;">
Here goes the code of the element you want to show
</div>
</b:if>
Note:

- The bolded text indicates to where you should paste the code of the element (eg. AdSense ad, a widget). 

- In red are the top margins (margin-top) and the bottom margins (margin-bottom), this is in case you want the element to move towards or away from the entries, also you can add any style like a background color, border etc..
Step 5. Preview to make sure everything is ok, then Save your Template by clicking on the Save template button. That's it!

Sunday, September 29, 2013

CSS Basics. How to Apply Rounded Corners On Images #2

In the previous post I have mentioned that we will learn to round images using CSS, without needing to edit them one by one using a program. Now that we have seen the basics of CSS, let's try to apply to some images.

What we will do is to upload an image as normal (HTML) and then add some rules in our style sheet that will transform the outer shape as a circle... or at least to appear round. This will depend on the proportions of image that we use.

In fact, we can apply this effect to any image, to all of an area or to all in our blog. That depends on your tastes.

Marking up HTML

Obviously the first thing we need for in order to round an image is an idem. The code could be more complicated, but an image is built within the img tag and basically looks like this:

<img src="image_URL"/>

Screenshot:


This is how we make it look something like the one from the left. Normally, it should also keep an alt text and sometimes it carries some forced dimensions (with width and/or height). When you upload an image, the code inside the Blogger editor also contains a link that is pointing to the original image.

But if we want to modify this image using CSS, we need to incorporate a class selector. We can add it in two ways: within the img tag or to a parent box. The name that I have chosen for the selector is roundedcorners:

<img class="roundedcorners" src="image_URL"/>


<div class="roundedcorners">
<img src="image_URL"/>
</div>


Applying style to all homogeneous elements

But that selector alone will do nothing. It needs to be linked to a style rule that tells what to do with it. As much as we add classes, if these are not defined in the CSS, the appearance of the image (or a certain element) will not change.

To change the shape of all the images on our blog, this would be what we should add to our CSS:

img {
border: 2px solid #BADA55;
margin: 0;
padding: 0;
border-radius: 900px;
-moz-border-radius: 900px;
}

And how it translates to your browser? As follows:

Search for images by name tag (img) and apply the following style:
  • a solid green border of 2 pixels
  • margins (space outside the border) and padding (space inside the border) is set to zero
  • the image is round at the four corners

Now that we have this rule in our style sheet itself, we can see the picture as we wanted - see the example on the right.

To declare a property correctly, we need to know what it does and how to write and you can find more info in many places, although W3C is the authority in this.

For example border-radius requires initially 4 values reading from left to right that represent the roundness of the upper-left, upper-right, lower-right and lower-left corner. If you put a single value is understood that all four will be equal to that.

You should also know that when the value of the border exceeds the dimensions of the box, this border is adapted to form a circle.

How to Apply Style to the Elements of the Same Block

But surely we do not want all the blog images to be round, but only those that we choose, otherwise adding the above style in the head tag will make all of our blog images to take this shape. Before we used an HTML tag (img) and not a selector and that is why the style will affect all images.
To avoid this, we can do one of the things we saw at the beginning and that was to put the image inside a div with the roundedcorners class. In this way, only the images that are in a box with that class will be affected by the rule that will make them round.

<div class="roundedcorners"><img src="image_URL"/></div>

But the rule then should not attack the img tag directly, but the roundedcorners selector. In this case, you should write it like this:

.roundedcorners img {
border: 2px solid #BADA55;
....
}

This means that this style applies only to images that are in a box with roundedcorners class.

Epilogue

To close the subtopic of rounding images, you have to keep in mind that if these are not square, instead of becoming circular, they will look oval.


To fix this we should add the width and height with the same measure (value in pixels), that is to force the image cropping and to make it appear perfectly circular. That was all!

If you enjoy reading this blog, please share and subscribe. For any questions, drop a comment below ;)


Wednesday, September 18, 2013

CSS Basics. How to Apply Rounded Corners On Images #1

This tutorial will explain how to change the outside border of any image using some simple CSS rules to make it round, but this is so easy to do, that I'm finally going to make this entry for other purposes.
rounded corners, css tricks, blogger tricks, blogger design
The trick today that I'm going to publish in two parts is to help to understand at least a little of what CSS (Cascading Style Sheets) is. But very briefly that I'm not able to do a good comprehensive manual on the subject. For those who want to see a bit more, take a look at this link and for those who really want to learn thoroughly, I recommend to visit this site.

Introduction and terminology

Style sheets aim to help sort out what is the structure of a website and which is its format, its appearance. Thus, the CSS box model is essentially a box that wraps around HTML elements, and it dictates how those boxes are presented in terms of colors, fonts, width, backgrounds etc.

The advantage is that if in the future we decide to change something, we don't have to change all the pages one by one, but simply change the properties of one kind or another box from the style sheet and these changes will automatically apply in all the pages.
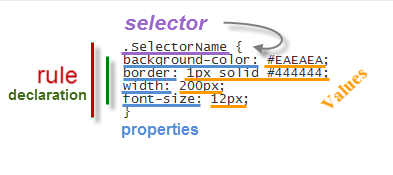
The style sheet is a set of rules, in turn composed of selectors and declarations. The selector is to be used as a nickname or name of what you want to configure from the sheet and apply to the HTML and declarations are properties that are assigned to the desired values ​​(more information on CSS syntax)

Adding the CSS selector

Once we put for example the one above in our style sheet, we see that in our website... nothing happens. I said that the selector is what relates HTML and CSS so that if we want a box to take these values ​​for width, background color, border and font size (that's what we defined earlier), we need to include the selector, thus:

<div class="SelectorName">Text here</div>

What we have added is a rule that tells the browser to interpret that this box has to be of a certain type or class. A class that was mentioned earlier is called selector having some specific properties and values ​​defined in the style sheet.

Now we'll see how this will change the look of the box, while all others that don't have the SelectorName  name will follow the standard appearance.

Therefore, when we include a rule in a style sheet, or modify an existing one, what happens is that all boxes marked with that selector will change their appearance according to the properties-values ​​that we have defined.

On the contrary, if we want that an unmarked box to change its appearance with the CSS rules defined, we'll add the appropriate selector.

Where to add the CSS style

The style can be put in a CSS file. The file is created with all the rules, you get the address and then include the following line in the header of your template. For Blogger, you can add it between <head> and <b:skin><![CDATA[/*:

<link href="syle.css" rel="stylesheet" type="text/css"/>

Note: in blue is where the address of your CSS file should be added.

You can also add the style directly mixed with HTML, inserted between the style tags:

<style>
.SelectorName {
background-color: #EAEAEA;
border: 1px solid #444444;
width: 200px;
font-size: 12px;
}
</style>

It can be inserted into a particular box, as well. In this case, you do not need to add any selector to indicate where the CSS style is:

<div style="background-color: #EAEAEA; border: 1px solid #444444; width: 200px; font-size: 12px;">Text here</div>

In Blogger the rules are between the skin tags, which means they are between <b:skin><![CDATA[/* and ]]></b:skin>. If you edit the template, will find that there are many things in between. All this is CSS that marks the appearance of your blog.

In case we want to see the effect after changing the value of some propriety, we can click on the Preview button. We can also remove anytime a declaration or add another to the desired selector.

For those who don't want to touch the template, you can add the CSS directly by going to the Advanced section > Add CSS of your Template Designer.


That's enough for today. The next tutorial will discuss in more detail about how to add rounded corners to our images using CSS.

Friday, August 23, 2013

10 Places to put Adsense ads in Blogger

In this article we'll talk about the most common 10 places in our blog where we can add AdSense ads and about how we can implement these and we'll get to know as well which are the most suitable formats based on those available in our AdSense account.

Adsense Advertisements

In the Sidebar

adsense, ads, add adsense blogger

How to implement

This is one of the easiest areas to put AdSense. Just go to the Page Elements (Layout), click on the "Add a Gadget" link, then add an HTML/Javascript widget with your ad code inside it or add directly an AdSense widget.

Recommended formats: 125 × 125, 120 × 600 and 160 × 600, 300 x 600

Between posts

blogger posts, blogger tricks, adsense ads

Implementation. You can add AdSense ads between your posts by going to Layout, click on the "Edit" link below the Blog Posts section, then check the "Show Ads Between Posts" option.

Recommended formats: 468 × 60, 300 × 250 and 336 × 280

Under the header

blogger header, blogger tips, adsense

Implementation:

Before anything, you need to convert your AdSense ad code - you can use this converter here:

AdSense Ad Converter

Next thing to do is to go to your Blogger Template (log in to your Blogger Dashboard, click on Template and press the Edit HTML button) and click anywhere inside the code area to search for the following code using the CTRL + F keys:
<div id='header-wrapper'>
Paste the converted code right after it.

Recommended formats: 728 × 90 and 728 × 15

Above the blog posts


make money, adsense, blogger tutorials

Implementation:

Convert your ad code and search for <div id='main-wrapper'> in your template.

Paste the converted code right after it.

Recommended formats: 460 × 68, 468 × 15 and 336 × 280

Under the post title (this will be visible on all the pages)

money online, blogger tricks, how to blogger
Implementation:

Convert your AdSense ad code and go to your Template > Edit HTML > click anywhere inside the code area and search for the following line (CTRL + F):
<div class='post-header-line-1'/>
Note: if you can't find it, search it without the ending slash /

Paste the converted code right after it.

Recommended formats: 468 × 68 and 468 × 15

Under the post title (visible only on the posts pages)

Implementation:

Convert your ad code and then go to your Template, click anywhere inside the code area and look for:
<div class='post-header-line-1'/>
Note: if you can't find it, search it without the trailing slash /

Paste the converted code, following this example:
<b:if cond='data:blog.pageType == "item"'>

<!-- Add here the code of your ad -->

</b:if>
Recommended formats: 468x68 and 468x15

In the posts' footer

post footer, adsense, blogger blogspot

Implementation:

Convert your ad code and then go to your Template > click anywhere inside the code area and look for:
<p class='post-footer-line post-footer-line-3'/>
Note: if you can't find it, search it without the trailing slash /

Paste the converted code right after this line.

Recommended formats: 468x68 and 468x15

In the post's body (it will be visible on all pages)

adsense how to, blogger tricks, gadgets

Implementation:

Convert your ad code and then go to your Template > click anywhere inside the code area and look for:
<div class='post-body entry-content'>
Note: in case you don't fint this code, search only for <div class='post-body'>

And paste the converted code by following the example below:
<div style='float:right'>

<!-- Add here the code of your ad -->

</div>
Recommended formats: 125x125, 180x150, 120x240 and 200x200

In the post's body (visible only in post pages)

Convert your ad code and then go to your Template, click anywhere inside the cod area and look for:
<div class='post-body entry-content'>
Note: in case you don't fint this code, search only for <div class='post-body'> 

And paste the converted code by following this example:
<b:if cond='data:blog.pageType == "item"'>
<div style='float:right'>

<!-- Add here the code of your ad -->

</div>
</b:if>
Recommended formats: 125x125, 180x150, 120x240 and 200x200

Between post and comments (visible only on posts pages)


Implementation:

Convert your ad code and then go to your Template, click anywhere inside the code area and look for:
</b:includable>
<b:includable id='commentDeleteIcon' var='comment'>
Paste the converted code just above it, following this example:
<b:if cond='data:blog.pageType == "item"'>

<!-- Add here the code of your ad -->

</b:if>
Recommended formats: 468x60, 300x250 and 336x280

In the blog's footer

blogger footer, adsense ads, make money online

Implementation:

Convert your ad code and then go to your Template, click anywhere inside the code area and look for:
<div id='footer-wrapper'>
Paste the converted code right after it.

Recommended formats: 728x90 and 728x15

FAQ

Some questions that are likely to arise:

I can't find the codes, what should I do?
When searching for a specific code, make sure that you have no spaces before/after it. These are the default codes of Blogger and should be found in all the templates unless they have been modified by the template designer.

Why should I convert my AdSense code?
The Blogger's Template reads it as text and not as code so it is better to avoid any errors when trying to save it.

The ads are not displaying properly, why is that?
The ads could be affected by the styles (CSS) selectors (divs) containing them and some templates could be wrong designed, then you should consider modifying these styles, look for another relevant place or in extreme cases, change the template.

Can I put the all 10 codes on my blog?
No, you should choose just one of the locations where you want to put the ads considering that AdSense have some limits on the number of ads that could be displayed. Try to make a balance with your content.

Why there should be only 3 ads displayed on the main page?
This is due to the limit set by AdSense. Combine the type of ads (text, rich media ads and link units) if you want to show more ads.
Hopefully, this guide will be useful to those of you who need to display AdSense ads on your blog.

Wednesday, July 24, 2013

Recent Comments Widget with Hide Author Comments function For Blogger

A few days ago, Mrpolie asked if there's a way to hide the author comments in the Recent Comments widget so that we would be able to see only readers' comments and our replies to be hidden. So, in this post I'll be sharing with you the Recent Comments widget that comes with this function. If you want to show just blog readers' comments rather than yours, you have just to change "Blogger User" text with the surname under which you are posting.

recent comments widget, recent comments, blogger

The main features of this recent comments widget:
  • You'll be able to hide your comments
  • Change the avatar size
  • Set the number of comments to display
  • Set the length of comment for the widget to display

Now let's start adding it...

Step 1. From your Blogger Dashboard, go to Layout and click on Add a Gadget link


Step 2. In the pop-up window, choose the HTML/JavaScript widget


Step 3. Copy-paste the following code:

Recent Comments Widget with Round Avatars: 

Click to see the code

Recent Comments Widget With Post Titles (no avatars): 

Click to see the code

Some changes before saving it.

- to set the number of comments to be shown, change the "5" value from the orange line
- for the number of characters, change the "67" (for the 2nd widget, it is 95) value from the green line
- to hide your comments, replace the Blogger User text TWICE with your name
- to change the size of avatar, change "50" from the blue line.
- if you don't want rounded avatars, delete this line:

-webkit-border-radius: 100px;-moz-border-radius: 100px;border-radius: 100px;
Step 4. Save your widget and you're done!

Thursday, July 18, 2013

Add a Different Background For Author Comments in Blogger's Threaded Comments

In this tutorial we will learn how to highlight the author comments so that they will have a different background color, border, or anything that makes them stand out from the others. To achieve this, we need to add a code in the Blogger's template and to modify the style according to our preferences.
blogger tricks, blogger comments
  

How to highlight author comments in Blogger:

Step 1. Go to Template, click on Edit HTML

blogger threaded comments, customize blogger comments

Step 2. Click anywhere inside the code area and try to find - using CTRL + F keys - this tag:
</body>
Screenshot:
blogger comments, blogger tricks

Step 3. Just above it, paste the following code:
<script src='http://code.jquery.com/jquery-latest.js'/>
<script>
$(function() {
function highlight(){
$('.user.blog-author').closest('.comment-block')
.css('border', '1px solid #FFA500')
.css('background','#F1F1F2 url("http://www.blogblog.com/1kt/transparent/white80.png")')
.css('color', '#444444')
.css('font-size', '12px')
.css('padding', '10px');
}
$(document).bind('ready scroll click', highlight);
});
</script>

Customizing the Author Comments:


Border:
The line marked in orange represents the border's style.
What it can be done:
  • 1px - you can increase the value to change the border's thickness
  • solid - change the border's style to dotted, dashed, inset, outset etc.
  • #FFA500 - this is the border's color value, change it with your own color
Background:
The line marked in blue represents the background's style. You can use a plain color or an image. By default there's a combination of both (a white transparent image with a gray plain color).
To change/add:
  • a different color: replace the #F1F1F2 value with your own 
  • an image: replace the defaul url http://www.blogblog.com/1kt/transparent/white80.png with that of your image

Font Color:
To change the font's color, replace the #444444 color value in green with your own. 
Font Size:
Modify the value in red by increasing/decreasing the "12" value in order to change the size of text.

Step 4. Now Save your Template.